


My Giant Pillow

Chris and I agree on most things; most being the operative word. One thing we disagree on is the use of decorative pillows. I do not condone the excessive use of decorative pillows - like when it takes over 30 seconds to dismantle a bed or when too many pillows prohibit one's ability to sit comfortably on a couch - but I do enjoy a few pillows here and there. Pillows can create interest and diversity in a room. Chris, on the other hand, detests all decorative pillows, for any reason.
As a compromise, Chris and I decided that I would be allowed just one decorative pillow for our bed. I thought it best to create the largest pillow with the largest pillow form I could find: 27 inches x 27 inches!


Aside from decoration, this giant pillow project provided an opportunity to give quilting a try. I've long romanticized quilt-making for its history and utility, but have been intimidated by the size of a finished quilt and, consequently, the amount of time necessary to complete a quilting project. Luckily, the Purl Bee is featuring monthly mini quilt tutorials that give their readers a chance to learn quilting on a smaller scale.
I chose to design this pillow using Purl Bee's Courthouse Steps tutorial from January 2011. Because Molly's instructions are both clear and concise, I rely heavily on her methodology below for the front of this pillow.

All seam allowances are 1/2" unless noted.
Materials
For the front:
1/4 yard each of 5 different prints, I used City Weekend by Moda fat quarters.
1/4 yard each of 3 different solids, I used white, yellow, and red fat quarters.
1/4 yard of border fabric, I used white.
30" x 30" piece natural cotton batting
30" x 30" backing fabric, I used white.
For the back:
2 15.5" x 28" pieces of fabric, I used white.
Other:
27" x 27" pillow form
coordinating thread
quilting safety pins
point turner
scissors
rotary cutter
cutting surface
measuring device, likely a quilting ruler
Directions
1. Cut multiple 2" strips from the various patterns and solids for the courthouse steps.
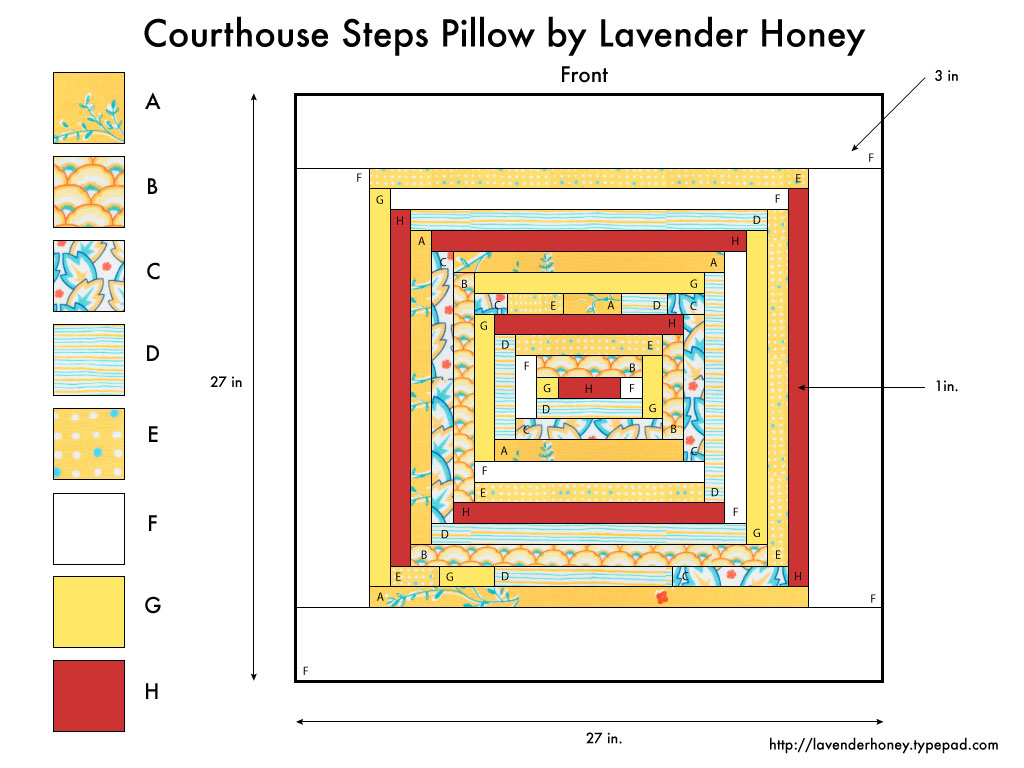
2. Utilizing the diagram provided below, piece together the courthouse steps as demonstrated in the Purl Bee tutorial until the piece measures 22 inches.
3. Using the border fabric, cut two 4" x 28" pieces and two 4" x 20" pieces. Sew to the 22" square using the courthouse steps construction.


4. Make your "quilt sandwich" by placing the 30" x 30" backing fabric on your work surface, wrong-side facing you. Followed with the cotton batting and finally the front, right-side facing you. Baste using the quilting safety pins. Quilt the "sandwich" as shown in the Purl Bee tutorial.
Note: Consider the extra 2" in batting and backing fabric as a safety net should the layers shift in any direction as you quilt. Once you've finished quilting the front of the pillow, trim the excess fabric and backing away. Set aside.

6. Grab one of the 15.5" x 28" back pieces. With the wrong-side facing you, fold one of the 15.5" edges back 1/4 inch. Press. Fold the same side back another 3.75 inches. Press, pin. Repeat with second 15.5" x 28" piece. Edge stitch each at 1/16 inch. See diagram below.
7. Pin the two back pieces to the front, wrong sides together. Sew around the perimeter of the pillow. Finish the seam using a serger or zig-zag stitch.
8. Turn pillow right-side out, turning the corners using the point turner. Put pillow form inside the case, lay your head on the pillow. Finally, smile with your eyes closed as you notice how comfy your new pillow is!
Diagrams
(finished pillow measurements)

Download the pdf for the pillow front.


Download the pdf for the pillow back.
As you can see, I have plenty of left over fabric from my fat quarters to do another one! But, I'll have to find something other than a pillow to make. A deal is a deal, isn't it?


Immediately after I took this picture, I took a giant nap on my new giant pillow. It was glorious!
 3 Comments
Reader Comments (3)