Entries from April 1, 2011 - April 30, 2011

Tuesday
Apr192011

Drape Drape, Love Love

Vol 1. The Cape Vest

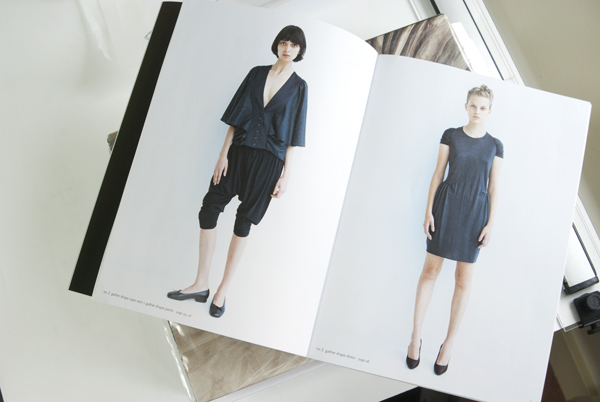
Drape Drape, written by Hisako Sato, is a Japanese pattern book that features full-scale patterns for 17 garments. Last fall, Kathryn Blackmore of The Vamoose wrote about Drape Drape on her blog and I was so smitten by the simplicity of the garments that I ordered the book immediately.

DSC_0359

After stewing over which pattern to make first, I finally chose the cape vest pictured on the left in the image below. 

DSC_0364

Drape Drape is written entirely in Japanese, but, as Kathryn also pointed out, the diagrams are clear enough to get through the construction without an understanding of the text. I did find some resources for Japanese-English sewing vocabulary from Japan Couture Addicts and Moving Hands should you be interested. 

Language barrier aside, I had enough concerns regarding the fit that I made the cape vest in muslin first. You may recall this image from a Sunday Funday post awhile back.

CapeVestWeb

Even though I knew that the side panels and sleeves would be made out of jersey, thus making those pieces less stiff in the final version of the cape vest, I remained hesitant. Something about those side panels reminded me of saddle bags. I feared that I would look frumpy, so I eliminated them. 

Frompage-Removal

The one on the right looks much better, don't you think? 

My fabric choices were: A painterly, pollock-esque Liberty of London print for the bodice, a cotton/bamboo jersey in ivory for the sleeve, and a cotton batiste in ivory for the lining. 

2up-3Above: The cape vest in construction.

Here's the finished cape vest! 

_MG_3195
Above: Finished cape vest from front.

_MG_3191
Above: Finished cape vest from side-front.

2up-2Above: Finished cape vest from back, side-back.

The cotton/bamboo jersey drapes beautifully! I thought that I may have trouble with it puckering as I was sewing it the the bodice, but it went into place without so much as a hitch. 

Here I am sporting the cape vest in the backyard yesterday. The sun was out(!), so the shades were required. 

DSC_0329

I like how the the cape vest is looks from the side best.

DSC_0353

Today, I did a little shopping to see if I could find something better for underneath the cape vest - the little cami just wasn't doing it for me. I came across this deep teal tank that I thought would look great.

_MG_3218

The sort of "drape on drape" is much closer to what I wanted. Now, on to choosing buttons. 

_MG_3203

2Up-4

The ivory guys match the sleeve perfectly. I like hope they pop out against the print. On the other hand, the little red ones remind me of red hot candies (yum!). What do do, what to do!?

Feel free to vote for the buttons you like in the comment section!

p.s. The book is available from Pomadour's Craft Cafe on etsy.

Friday
Apr152011

image{s} of the week

MyLady
My Lady

camera: Nikon D80
settings: f 3.5; 1/60
behind the lens: me

Check out that perdy lady!

Every time I see her, I just wanna give her a big hug. Okay, I don't just wanna give her a hug, I actually do sometimes. She's been acclimating to the shed before she tells me what her name is. For now, she's just My Lady. 

AH!

Using a large hammer, I set My Lady free from her prison crate only to find her unable to stand up straight. Luckily our (buff) landlords were working in the basement and able to bend her back into shape. Phew! 

Thursday
Apr142011

My Giant Pillow

Chris and I agree on most things; most being the operative word. One thing we disagree on is the use of decorative pillows. I do not condone the excessive use of decorative pillows - like when it takes over 30 seconds to dismantle a bed or when too many pillows prohibit one's ability to sit comfortably on a couch - but I do enjoy a few pillows here and there. Pillows can create interest and diversity in a room. Chris, on the other hand, detests all decorative pillows, for any reason. 

As a compromise, Chris and I decided that I would be allowed just one decorative pillow for our bed.  I thought it best to create the largest pillow with the largest pillow form I could find: 27 inches x 27 inches!

DSC_0374

DSC_0381

Aside from decoration, this giant pillow project provided an opportunity to give quilting a try. I've long romanticized quilt-making for its history and utility, but have been intimidated by the size of a finished quilt and, consequently, the amount of time necessary to complete a quilting project. Luckily, the Purl Bee is featuring monthly mini quilt tutorials that give their readers a chance to learn quilting on a smaller scale. 

I chose to design this pillow using Purl Bee's Courthouse Steps tutorial from January 2011. Because Molly's instructions are both clear and concise, I rely heavily on her methodology below for the front of this pillow.

DSC_0314


All seam allowances are 1/2" unless noted.

Materials

For the front:    
1/4 yard each of 5 different prints, I used City Weekend by Moda fat quarters.
1/4 yard each of 3 different solids, I used white, yellow, and red fat quarters.
1/4 yard of border fabric, I used white.
30" x 30" piece natural cotton batting
30" x 30" backing fabric, I used white.

For the back:
2 15.5" x 28" pieces of fabric, I used white.

Other:
27" x 27" pillow form
coordinating thread 
quilting safety pins 
point turner
scissors
rotary cutter
cutting surface
measuring device, likely a quilting ruler 

Directions

1. Cut multiple 2" strips from the various patterns and solids for the courthouse steps. 

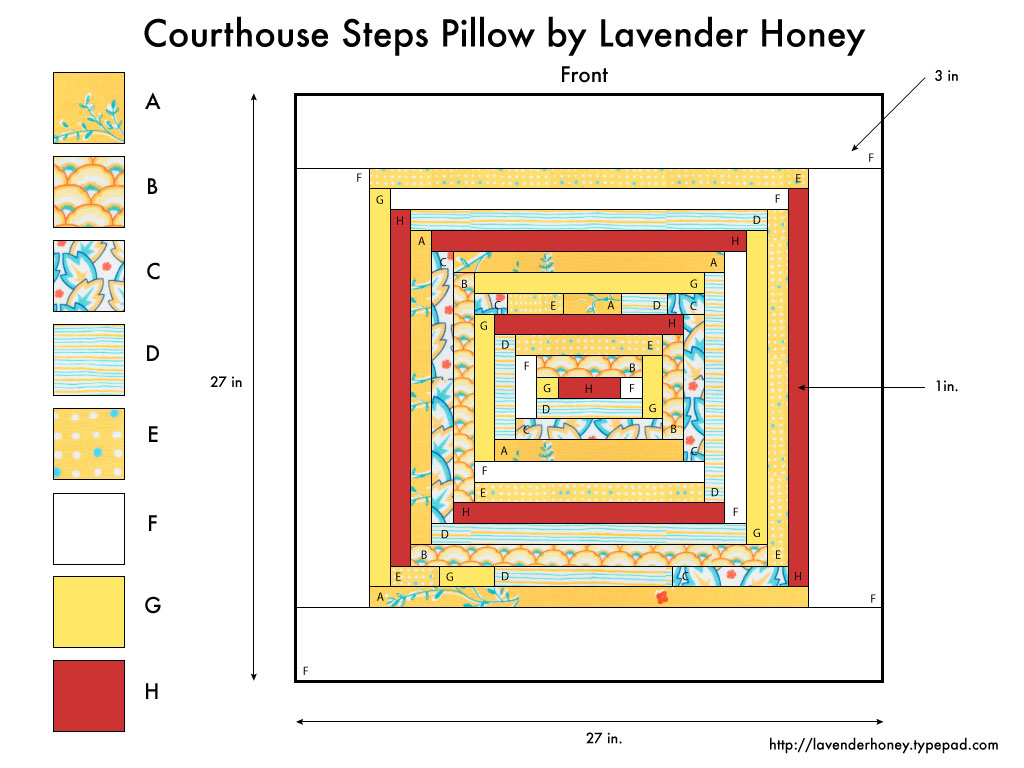
2. Utilizing the diagram provided below, piece together the courthouse steps as demonstrated in the Purl Bee tutorial until the piece measures 22 inches.

3. Using the border fabric, cut two 4" x 28" pieces and two 4" x  20" pieces. Sew to the 22" square using the courthouse steps construction.

  DSC_0398

  DSC_0318

4. Make your "quilt sandwich"  by placing the 30" x 30" backing fabric on your work surface, wrong-side facing you. Followed with the cotton batting and finally the front, right-side facing you. Baste using the quilting safety pins. Quilt the "sandwich" as shown in the Purl Bee tutorial.

Note: Consider the extra 2" in batting and backing fabric as a safety net should the layers shift in any direction as you quilt. Once you've finished quilting the front of the pillow, trim the excess fabric and backing away. Set aside.  

DSC_0337 

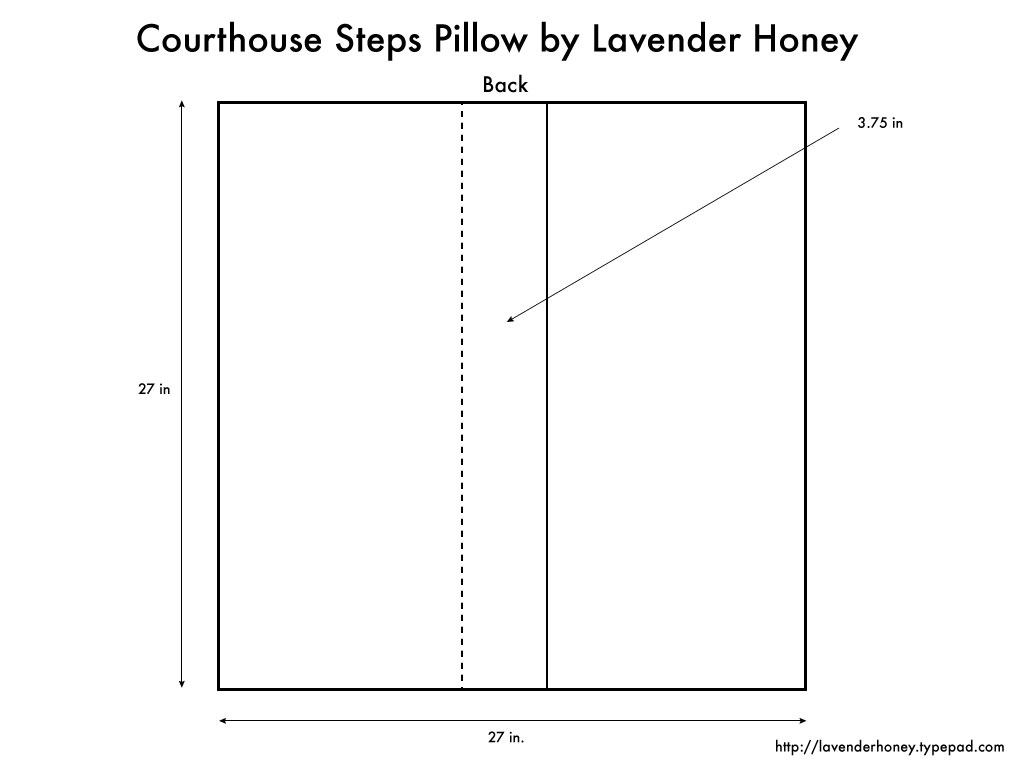
6. Grab one of the 15.5" x 28" back pieces. With the wrong-side facing you, fold one of the 15.5" edges back 1/4 inch. Press. Fold the same side back another 3.75 inches. Press, pin. Repeat with second 15.5" x 28" piece. Edge stitch each at 1/16 inch. See diagram below. 

7. Pin the two back pieces to the front, wrong sides together. Sew around the perimeter of the pillow. Finish the seam using a serger or zig-zag stitch.

8. Turn pillow right-side out, turning the corners using the point turner. Put pillow form inside the case, lay your head on the pillow. Finally, smile with your eyes closed as you notice how comfy your new pillow is!

Diagrams
(finished pillow measurements)

DSC_0339


Download the pdf for the pillow front.

DSC_0348


Download the pdf for the pillow back.

As you can see, I have plenty of left over fabric from my fat quarters to do another one! But, I'll have to find something other than a pillow to make. A deal is a deal, isn't it?

DSC_0423

DSC_0371

Immediately after I took this picture, I took a giant nap on my new giant pillow.  It was glorious!

Wednesday
Apr132011

WedWed - Wedding Wednesday {14}

A Big Buck Hunter Wedding.

Last week's WedWed post instigated to the following Facebook conversation:

Screen shot 2011-04-13 at 6.29.49 PM


When I initially glanced at Andy's "DUMB" comment, I rolled my eyes. "Chris's wedding gear is gorgeous," I scoffed to myself. "What does Andy know anyway?"

Then I clicked on his link and burst out laughing. I should have known he'd pull something like a camo tux out of nowhere.

Thanks to Andy, I've been obsessing about the idea of a Big Buck Hunter wedding all week. Could a camouflage wedding be cool? Does Andy have a future career as a wedding stylist?

CamoLook


Maybe, just maybe, it wasn't such a terrible idea. This getup featuring a Michael Kors camo bag, a JCrew silk organza dress, and Rampage camo heels isn't that bad. After all, when we were in the process of moving to Seattle we did compile a list of places in and around our new neighborhood that had a Buck Hunter machine. During our first visit, we made it a point to go to at least one of the bars on our list. I remember being very proud of Chris getting a few Hunter Heros that weekend! 

I imagine, if we did have a Buck Hunter themed wedding, it'd look like this:

BBHWedding

Don't shoot the cows!

**If you like anything in the collage I made above (maybe you want to have your own camo wedding?), email me and I'll do my best to find the original links again!**

Friday
Apr082011

image{s} of the week

InPlainSight 

Hiding in Plain Sight

camera: iPhone 3GS
application: Instagram
filter: Hefe
behind the lens: Chris

The Gata typically comes to us when she's called. The only exception is when she is hiding under the bench in the entry. We call her and call her, but she ignores us and remains frozen under that bench. She can't see us, so she assumes we can't see her.

Hey Gata, I know you're there!